

Ground Vibration Monitoring Standards and Methodology
Ground Vibration Monitoring Standards:

Note that most ground vibration standards develop from the mining industry as opposed to the construction industry. The Office of Surface Mining Reclamation and Enforcement is “responsible for establishing a nationwide program to protect society and the environment from the adverse effects of surface coal mining operations.” Hence, it publishes a number of papers from its research regarding ground vibration from blasting. Although these papers will provide good information, it isn’t always 100% applicable to construction ground vibration. While the papers below will be of benefit, it is ultimately up to the ground vibration monitor user to research and use due diligence when conducing a survey.
Useful OSMRE Papers:
Reports of Investigation 8507 – Structure Response and Damage Produced by Ground Vibration from Surface Mine Blasting
Abstract:
The Bureau of Mines studied blast-produced ground vibration from surface mining to assess its damage and annoyance potential, and to determine safe levels and appropriate measurement techniques. Direct measurements were made of ground vibration produced structure responses and damage in 76 homes for 219 production blasts. These results were combined with damage data from nine other blasting studies, including the three analyzed previously for Bureau of Mines Bulletin 656.
Safe levels of ground vibration from blasting range from 0.5 to 2.0 in/sec peak particle velocity for residential-type structures. The damage threshold values are functions of the frequencies of the vibration transmitted into the residences and the types of construction. Particularly serious are the low-frequency vibrations that exist in soft foundation materials and/or result from long blast-to-residence distances. These vibrations produce not only structure resonances (4 to 12 Hz for whole structures and 10 to 25Hz for midwalls) but also excessive levels of displacement and strain.
Threshold Damage:
Threshold damage was defined as the occurrence of cosmetic damage; that is, the most superficial interior cracking of the type that develops in all homes independent of blasting. Homes with plastered interior walls are more susceptible to blast-produced cracking then modern gypsum wallboard; the latter are adequately protected by a minimum particle velocity of approximately 0. 75 in/sec for frequencies below 40 Hz.
Structure response amplification factors were measured; typical values were 1.5 for structures as a whole (racking) and 4 for midwalls, at their respective resonance frequencies. For blast vibrations above 40 Hz, all amplification factors for frame residential structures were less than unity.
The human response and annoyance problem from ground vibration is aggravated by wall rattling, secondary noises, and the presence of airblast. Approximately 5 to 10 pct of the neighbors will judge peak particle velocity levels of 0.5 to 0.75 in/sec as “less than acceptable” (i.e., unacceptable) based on direct reactions to the vibration. Even lower levels cause psychological response problems, and thus social, economic, and public relations factors become critical for continued blasting.
NCHRP 25-25/Task 72 – Current Practices to Address Construction Vibration and Potential Effects to Historic Buildings Adjacent to Transportation Projects
Abstract:
NCHRP identified a need for a comprehensive compilation of current and successful practices that address construction vibration impacts on historic buildings adjacent to roadway construction projects. The goal of this compilation is to help historic preservation resource agencies and organizations, departments of transportation (DOTs), and the public understand the technical aspects of vibration impact studies.
To prepare the compilation of current and successful practices, the research team conducted a review of literature authored in the United States and abroad to identify the current state of the art for assessing the fragility of historic structures and their susceptibility to damage, for monitoring vibration transmission from construction projects, and for mitigating potentially damaging vibration.
The research team also surveyed state DOTs and other agencies to understand how they currently address this issue and to identify several case studies that illustrate how construction vibration effects on historic buildings have been recently evaluated.
This report summarizes the results of the literature search and the survey of transportation agencies and provides a detailed discussion of seven informative case studies. A recommended guideline approach for addressing construction vibration effects on historic buildings has also been provided.
Report of Ground Vibration And Airblast Compliance Methods Research
Abstract:
The Office of Surface Mines (OSM) has established four monitoring methods for regulatory compliance. Field data collected from large and small coalfield production blasts, blast log data from West Virginia Department of Environmental Protection (WVDEP) Notice of Violations, and damage claim adjustor reports are used to make comparisons between these compliance methods and their differences in measuring the adverse effects of blasting operations.
Report of Investigations 8506 – Measurement of Blast-Induced Ground Vibrations and Seismograph Calibration
Abstract:
Blast-induced ground vibrations from surface coal mine, quarry, and construction blasting were measured and analyzed for frequency content and duration characteristics. Eighteen commercially available ground vibration measurement systems were evaluated in the field and laboratory for linearity, accuracy, and crosstalk. Buried, surface, and sandbagged transducer placement methods were compared, along with peak and vector-sum measurements.
The recommended minimum frequency ranges for ground vibration instrumentation are 2 to 150 Hz for coal mine and quarry blasting, and 5 to 200 Hz for construction and excavation blasting. When higher or lower frequency vibrations are possible, as in construction blasting or for a quarry shot close to a residence, care should be taken to insure proper choices of instrumentation and vibration criteria.
Several instruments operating in these ranges are available, and all but one of the seismographs tested fell within ±3-dB accuracy limits (+41 pet, -29 pet).
Waveform recordings of all three ground vibration components are recommended as the peak amplitude and frequency may vary among the three. Peak or vector-sum readings are adequate if only amplitude levels are desired. The soil density matched box should be anchored or buried, particularly for high frequency, high-amplitude construction blasting.
Ground Vibration Monitoring Methodology Disclaimer:
The following is a summary of the”ISEE Field Practices for Blasting Seismograghs 2015″ developed by the International Society of Explosives Engineers. While these blast monitoring guidelines may be helpful in other ground vibration and air overpressure monitoring cases, they are for blasting so use due diligence. Ultimately, it is up to the operator to use his or her experience, judgment, and knowledge in order to collect accurate and consistent results.
For the most complete and accurate description of the ISSE field practices, please visit https://www.isee.org/
Ground Vibration Monitoring Methodology General Guidelines:
The government establishes laws and regulations pertaining to ground vibration and blast induced air overpressure to prevent damage to property and injury to people. Please research and follow your federal, state, and local laws and regulations before conducting any survey. These ground vibration monitoring methodology guidelines will help an operator collect consistent and accurate data with confidence under most circumstances.
Guidelines
- Foremost, understand the operation of the ground vibration monitor. This means reading the instrument’s user manual and taking the time to learn the instrument before going into the field. Basically, eliminate errors by setting aside the proper amount of preparation time.
- In addition, check that the ground vibration monitor’s annual calibration is current. Depending on the unit, the operator may receive a certificate of calibration or there may be a sticker on the unit verifying calibration. Moreover, monitors, geophones, and microphones may or may not have separate calibrations. Therefore, look at all components of the vibration monitor.
- Maintain good notes. Include the operator’s name, current date & time, address, and other important information.
- Document the precise location of the ground vibration monitor. Ultimately, another person should be able to locate the exact placement of the ground vibration monitor by your notes. If they cannot do this, the operator’s documentation was inadequate.
- Measure and record the distance to the blast to at least two significant figures because accuracy is paramount.
- Record the vibration. Set the trigger levels low enough that the monitor collects all important data but high enough that false triggers do not occur.
- Record the full time history waveform. Do not use summary or single peak value recordings for monitoring blast-induced vibrations. Moreover, operating modes that report peak velocities over a specified time intervals are not recommended when recording blast-induced vibrations.
- Program the sampling rate to capture the entire blast event with detail. The sample rate should be at least 1000 samples per second.
- Know the time it takes for a unit to process data in order to capture a blast and prevent missing the next blast.
- Know the memory limitations of the ground vibration monitor. As a result, it might be important to download events to free up the instrument’s memory for the next set of events.
- Know whether a survey requires a report in the field or not. If so, make sure a printer is available. Some ground vibration monitors come with a built-in printer. Otherwise, rent or buy a field printer. In addition, test any external printer in conjunction with the ground vibration monitor before going out in the field.
- Allow enough time to program the survey parameters without rushing to do so before an event. Fewer mistakes or errors occur due to time for preparation and planning,
- Know the temperature because different units can operate in different temperature ranges.
- Finally, secure the cables, geophone, and microphone to prevent false triggers.
Ground Vibration Monitoring Factors:
As a result of a proper placement and coupling of the geophone, consistent and accurate results can be collected.
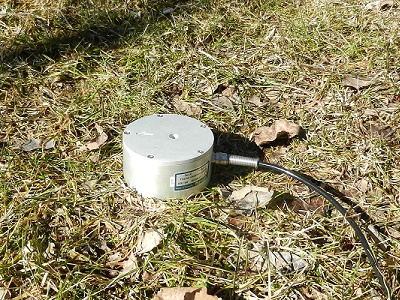
Sensor Placement
Place the sensor on or in the ground on the side of the structure that faces the blast or seismic source. Due to poor coupling and other inconsistencies, avoid measurements on driveways, sidewalks, and concrete slabs if possible.
- Place the sensor in an area that will accurately collect data that represents the ground-borne vibration levels received at the structure. Therefore, place the sensor within 10 feet of the structure or less than 10% of the distance from the blast, whichever is less.
- Evaluate the soil density. Do not place the sensor on loose fill, unconsolidated soils, mulch, or unusual mediums since it does not accurately transfer vibration that structure receives. Hence, place the sensor on undisturbed or compacted soils.
- The sensor must be nearly level in order to collect accurate readings.
- Point the longitudinal channel words the seismic source. Moreover, some geophones possess an arrow
to point towards the seismic source in order to make sure each axis is properly orientated.
- If access to a structure or property is not available, the sensor should be placed closer to the blast in undisturbed soil.
Sensor Coupling
Once the acceleration exceeds 1.96 m/s2 decoupling of the geophone may occur. Consequently, if an operator expects an acceleration of this magnitude, the geophone probably needs coupling by spiking, burial or sandbagging.
-
Acceleration Considerations:
a) If the acceleration is expected to be less than 1.96 m/s2 then no burial or attachment is necessary.
b) If the acceleration is expected to be between 1.96 m/s2 and 9.81 m/s2 then burial or attachment is preferred. Spiking may be acceptable.
c) Finally, if the acceleration is expected to be greater than 9.81 m/s2 then burial or attachment is required.
| Frequency HZ | 4 | 10 | 15 | 20 | 25 | 30 | 40 | 50 | 100 | 200 |
| Particle Velocity mm/s (in/) at 1.96 m/s2 (0.2g) | 78.0
(3.07) | 31.2
(1.23) | 20.8
(0.82) | 15.6
(0.61) | 12.5
(0.49) | 10.4
(0.41) | 7.8
(0.31) | 6.2
(0.25) | 3.1
(o.12) | 1.6
(0.06) |
| Particle Velocity mm/s (in/) at 9.81 m/s2 (1.0g) | 390
(15.4) | 156
(6.14) | 104
(4.10) | 78.0
(3.07) | 62.4
(2.46) | 52.0
(2.05) | 39.0
(1.54) | 31.2
(1.23) | 15.6
(0.61) | 7.8
(0.31) |
2. Burial or Attachment Methods:
a) To bury the sensor, excavate a hole no less than three times the height of the censor and spike it to the bottom of the hole. Next, fill the hole with soil on and around the sensor. Then, compact the soil after filling it.
b) To attach to bedrock, bolt or clamp the sensor to the bedrock with a kit provided by the ground vibration monitor’s manufacturer. Therefore, inquire with your ground vibration monitor’s manufacturer or rental company.
c) If you cannot bury, spike, or sandbag a sensor, attach the sensor to the foundation of a structure if located within 1 foot of the ground level.
3. Other sensor placement methods:
a) Shallow burial is anything less than described in 2a.
b) Spiking requires removing the sod and making sure it is level. Then, firmly place the sensor with the attached spikes in the ground.
c) Sandbagging entails removing the sod, placing the sensor on bare, level soil, and putting a loosely filled 10lb sandbag on top of the sensor. Notably, the sandbag profile should be as low and wide as possible with a maximum amount of firm ground contact.
d) Lastly, when needed, a combination of spiking and sandbagging ensures good coupling.
Ground Vibration Monitoring Methodology Programming Considerations:
Ultimately,ground vibration monitor programming depends on site conditions.
1. Trigger level. The trigger level should be high enough to minimize false readings but low enough to capture all events. Frequently, a good starting level is 0.05 in/s. As always, use prior experience to make the best decision.
2.Dynamic range and resolution. If the ground vibration monitor does not have an auto-range function, the operator should estimate the expected vibration level and program this range. Accordingly, the resolution of the printed waveform should allow verification of whether or not the event was a blast
3.Recording duration. Set the record time to two seconds longer than the expected blast duration plus 1 additional second for every 1100 feet from the blast, thus, making certain to record the full blast.
Air Overpressure Monitoring Factors:
Because accurate sound pressure level readings are important, proper microphone placement and protection of the microphone is important.
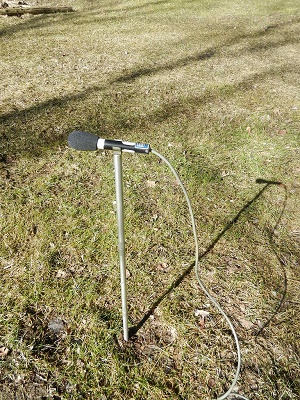
Microphone location and orientation
- Place the microphone on the side of the structure nearest to the blast to record accurately.
a) Mount the microphone near the geophone with the wind screen attached. Due to false triggers from wind, never record without a wind screen.
b) Place the microphone at any height above the ground. Many microphones come with a microphone stand that spikes into the ground. Obviously, some may be adjustable but others are not.
c) Do not shield the microphone from the blast by any object since this prevents an accurate reading. For example, an object could be a building, vehicle, or anything else that obstructs the path of the air pressure caused by the blast. If preventing shielding is impossible due to uncontrollable circumstances, make certain the horizontal distance between the microphone and the shielding object is greater than the height of the shielding object above the microphone.
d) If a microphone is placed too close to a structure, higher amplitudes may be recorded that have reflected off the structure surface. Thus, minimize this by placing the microphone near the corner of the structure.
e) Finally, the orientation of the microphone is not important for air frequencies below 1,000 Hz.
2. Prevent the damaging or triggering of a microphone due to rain or other elements by protecting it.
a) Keep microphones inside security boxes or other protective covers as long as the air pressure inside the cover reflects the air pressure in the surrounding environment.
b) If no protective cover is available, then, cover the microphone’s wind screen loosely with a thin plastic bag. Some exchange of air between the inside and outside of the bag must be allowed so that condensation doesn’t occur, static pressure doesn’t build-up, and rain does not cause triggers from pulsating raindrops on the bag.
Programming Considerations.
Ground vibration monitor air overpressure programming depends on site conditions.
1.Trigger level. The trigger level should be high enough to minimize false readings but low enough to capture all events. A good starting level is above any expected background noise for the area. Typically, a good starting level is 20 Pa (o.20 millibars or 120dB).
2. Recording duration. When only recording the air overpressure, set the recording time to at least 2 seconds longer than the blast duration. If measuring ground vibration and air over pressure, set the record time to two seconds longer than the expected blast duration plus 1 additional second for every 1100 feet from the blast.